Fig. 2.- A rectangle equal to two squares. A shelter roomy and warm, with part of one side open toward the fire.
The following article was originally published in the April 1911 issue of Recreation magazine. It was later reprinted as part of the 1917 Boy Scout Handbook. This is the article in it's entirety. I won't apoligize for the spelling, as I copied it exactly - odd spellings and all. However, the pics are scanned from a copy of a copy of a copy - etc. Please excuse the quality (or lack thereof). - ELB
Tent Making Made Easy By H.J.Holden
The accompanying sketches show a few of the many different tents which may be made from any available piece of cloth or canvas. The material need not be cut, nor its usefulness for other purposes impaired, except that rings or tapes are attached at various points as indicated. For each tent the sketches show a front elevation, with a ground plan, or a side view; also a view of the material laid flat, with dotted lines to indicate where creases or folds will occur. Models may be made from stiff paper and will prove as interesting to the kindergartner in geometry as to the old campaigner in camping.
In most of the tents a ring for suspension is fastened at the centre of one side. This may be supported by a pole or hung by means of a rope from any convenient fastening; both methods are shown in the sketches. Guy ropes are required for a few of the different models, but most of them are pegged down to the ground.
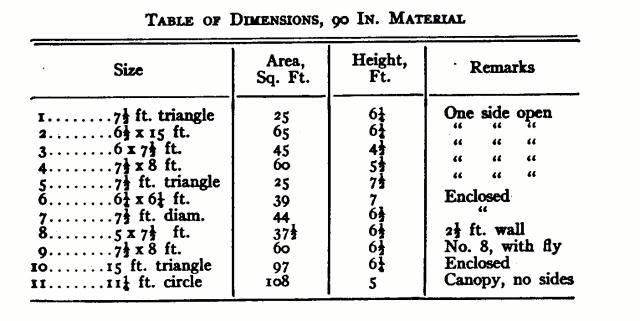
After making paper models, find a stack cover, a tarpaulin, a tent fly, an awning, or buy some wide cotton cloth, say 90-inch. All the shapes may be repeatedly made from the same piece of material, if the rings for changes are left attached. In Nos. 3, 4, 6, 7, 8, 9, 11, a portion of the canvas is not used and may be turned under to serve as sod-cloth, or rolled up out of the way. If your material is a large piece, more pegs and guy lines will be required than is indicated in the sketches. The suspension ring, 1 or inches or 2 inches in diameter, should be well fastened, with sufficient reinforcement to prevent tearing out; 1-inch rings fastened with liberal lengths of tape are large enough for the pegs and guy lines. Also reinforce along the lines of the strain from peg to pole.
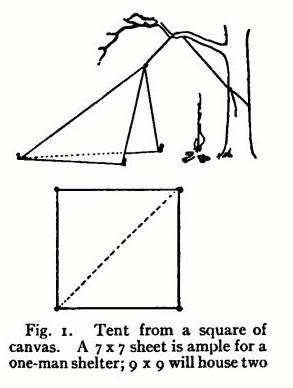
Fig. 1.-A square of material hung by one corner, from
any convenient support, in a manner to make a comfortable shelter; it
will shed rain and reflect heat. This square makes a good fly or a
good ground cloth for any of the tents.
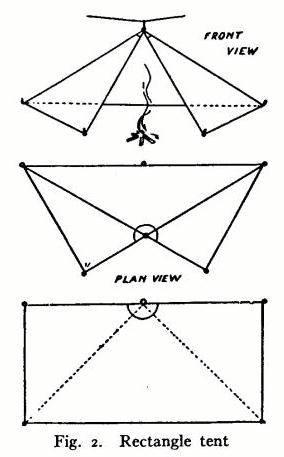
Fig. 2.- A rectangle equal to two squares. A shelter
roomy and warm, with part of one side open toward the fire.
Fig. 3.- Here the rectangle is folded to make a "lean-to" shelter, with the roof front suspended from a rope or from a horizontal pole by means of cords. The two corners not in use are folded under, making a partial ground cloth. A square open front is presented toward the camp fire.
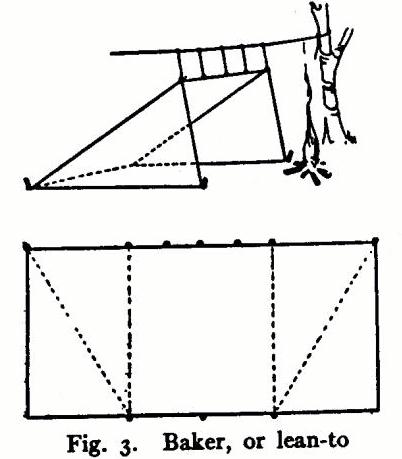
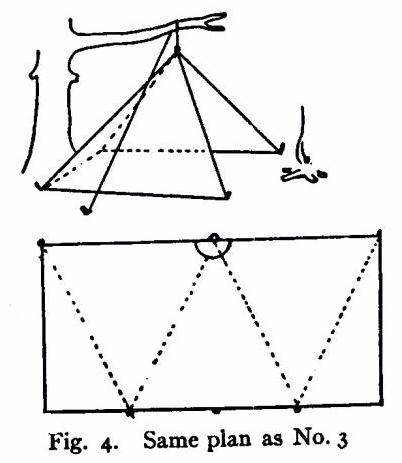
Fig. 4.- Same in plan as No. 3, but has triangular front and only one point of suspension.
Fig 5.- Uses all the cloth, has a triangular ground plan, a square front opening, plenty of head room at the back and requires two or more guy lines. This shelter resembles a "toque".
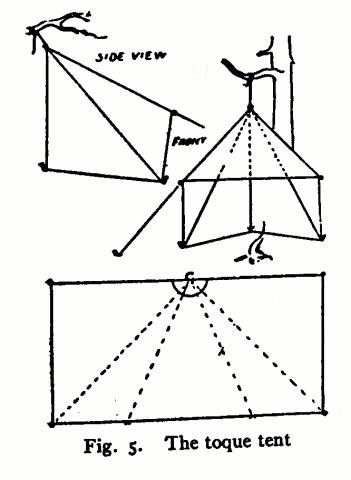
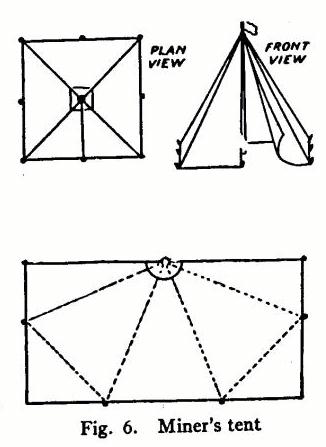
Fig. 6.- Square or "miner's" tent. Two corners are turned under. This tent is enclosed on all sides, with a door in front.
Fig. 7. - Conical tent or "wigwam," entirely
enclosed, with door in front. Two corners of the canvas are turned
under. 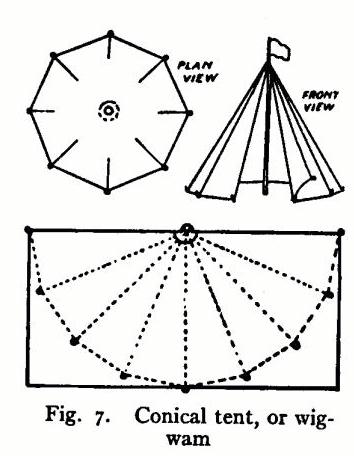
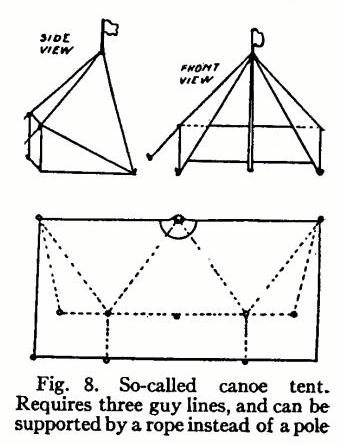
Fig. 8. - Has a wall on one side and is called a "canoe tent" in some catalogues. It requires two or more guy lines and is shown with a pole support. The front has a triangular opening.
Fig. 9.- A combination of No. 8, with No. 1 in use as
an awning or fly. This sketch shows both tent and fly suspended by
means of a rope. The "awning" may be swung around to any
angle. 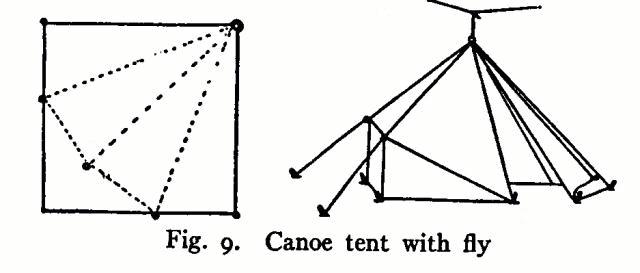
Fig. 10.- Combination of Nos. 1 and 2; they may be fastened together by a coarse seam or tied with tapes. The ground plan is an equal-sided triangle, with a door opening on one side, as shown. There is no waste cloth.
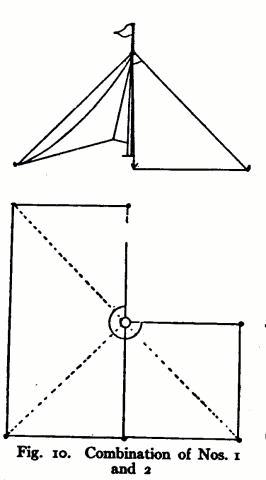

Fig. 11.-No. 10 changed to a conical shape and
suspended as a canopy. The circular shape is secured by the use of
small size gas pipe or limber poles bent into a large hoop. Of course
guy lines may be used, but would probably be in the way. Notice that
a little more material for making a wall would transform the canopy
into a "Sibley" tent.
There are other shapes and combinations, but perhaps these sketches are enough in the line of suggestion.
The diagram Fig. 12 shows a method
for laying out, on your cloth, the location of all the rings to make
the tents and shelters. No dimensions are given and none is required.
The-diagram is good for any size. Most of the fastenings are found on
radial lines, which are spaced to divide a semi-circle into eight
equal angles, 22 1/2 degrees each. These intersect other construction
lines and locate the necessary loops and rings. Figures are given at
each ring which refer back to the sketch numbers. 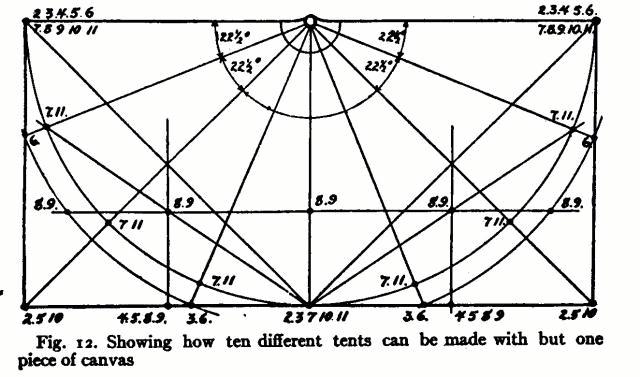
If in doubt about the location of
rings on your canvas, suspended the tent by the centre ring and
fasten the loops temporarily by means of safety pins, draw the tent
into shape and shift the fastenings as required. The guy lines should
have hooks or snaps at one end for ready attachment and removal; the
other end should be provided with the usual slides for 'take up'. The
edge of the cloth where the large ring for suspension is fastened
should be bound with tape or have a double hem, for it is the edge of
the door in most of the tents shown.